Create a new page you want to display in the menu.
SAVE PAGE
Add content in the editing area. SAVE PAGE
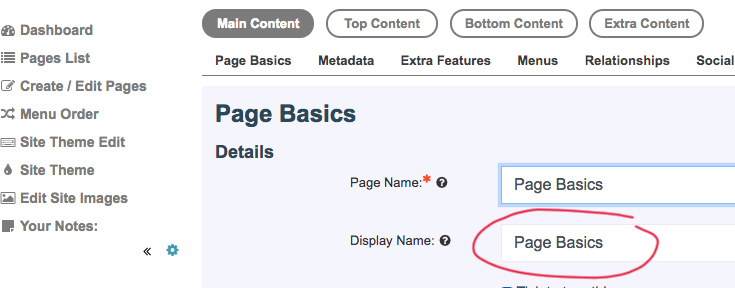
Under 'Page Basics': make the Display name the name you want to appear in the menu.
Click on the'Menus'item at the top of the text editor.
Under Page Menus tick the following items:
Empty Site Cache: Tick the box
Page In Menu:Tick to display the page 'Display Name' in your website menu. SAVE PAGE
Page Position: Type the number where you want it to appear in the menu or click the link called "here" to re-order the menu items. SAVE PAGE
To make an existing page show in the menu bar
Go to the page you want in the menu.
Under Page Basics change the Display name to the name you want to appear in the menu. SAVE PAGE
Click on the'Menus'item at the top of the text editor.
Under Page Menus tick the following items:
Empty Site Cache: Tick the box
Page In Menu:Tick to display the page 'Display Name' in your website menu. SAVE PAGE
Page Position: Type the number where you want it to appear in the menu or click the link called "here" to re-order the menu items. SAVE PAGE
To change the text in a menu tab
On the page you want to change.
Go‘Page Basics’and change the text in theDisplay Namefield.SAVE PAGE
Reordering menu items
Go to the page you want to move, and click Menus(above the page editor): Under Menu Details/Page Position: Change the number. And Empty Site Cache: Tick the box
You may have to re-number other pages.
OR:
At the very top menu, under your site icon and name: go'Page Tools'
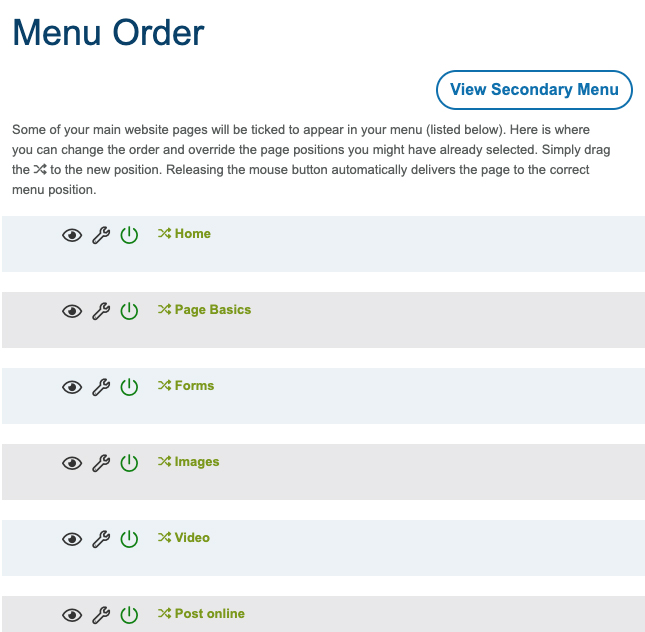
Go:Menu Order
On the menu item you want to move, click on the double twisted arrow icon and drag it to the position you want.
More on menu order
As you create pages in your site Administration, key pages need to be placed in your site menu (left menu and/or horizontal menu). These menus are your main menu. The position of the pages in the menu will be determined by the number you've allocated to its Page Position:. For example, position 0 is likely to be your Home Page, and so on down 1, 2, 3, etc.
The Menu Order (under page Tools) facility allows you to quickly and easily change the menu order and see the ON / OFF status of pages available for the menu.
You may, if it is enabled on your site, switch to editing the Secondary Menu pages by clicking on the button to the right.
Dropdown menus
Parent (main menu) and children relationships (sub-menus/dropdowns)
To get Child menu to dropdown below Parent menu. This is a two step process.
Step 1
Go to, or create your page you want to be the ‘child (dropdown)’
In the page you want to make a child (dropdown) of a Parent:
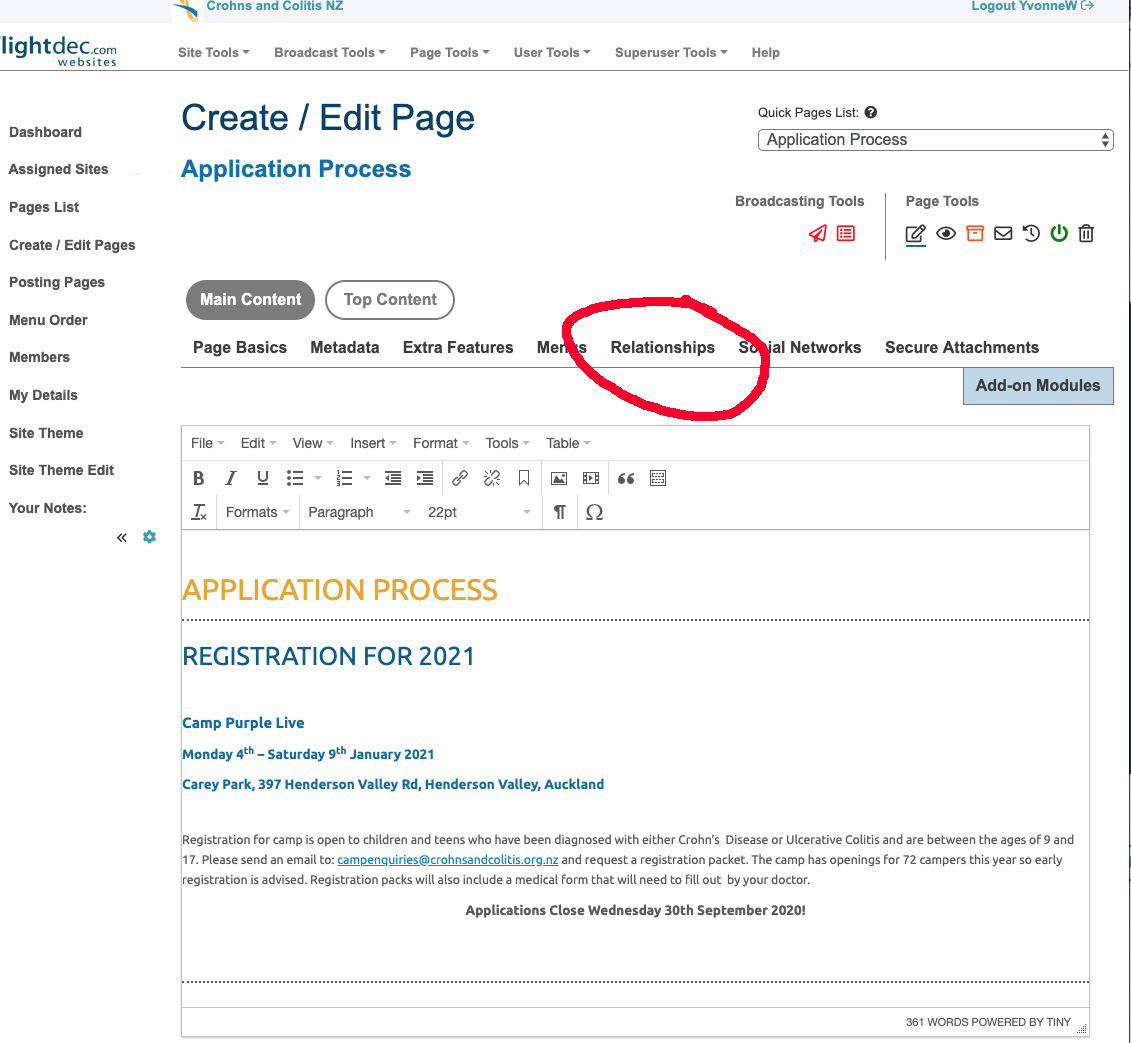
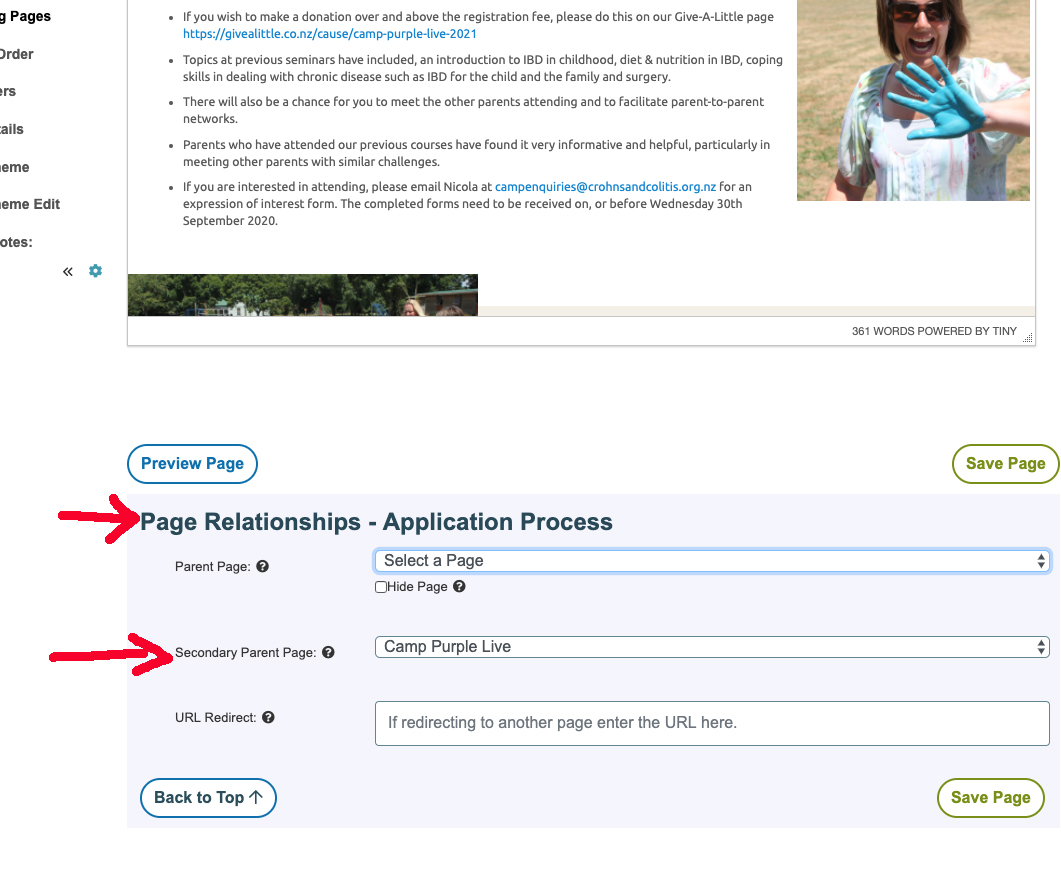
In the top menu above the Text editor click:Relationships Page Relationships: Parent Page:Choose your Parent page you want this child page to dropdown below.SAVE
Step 2
In the top menu above the Text editor click: Menu
Empty Site Cache: Tick the box
Menu Details: Page In Menu: Tick the box (if step 1. has been done it will show in the menu as a dropdown) Page Position: fill in the order you want the page to appear
NOTE: The Secondary Menu is not a dropdown but refers to a second menu line that is on the site. Some sites do not have a Secondary Menu.
If the dropdown menu don’t look right, contact ‘Flightdec Help’ they may need to have some extra coding done on them.
Dropdown menu display activation
User 'click' to activate the is the default.
In the menu Site Theme Config: Menu Display Activation: 'click' means the viewer has to open and close the dropdowns and can have all dropdowns open at the same time.
'hover' will change to automatically dropdown when the viewer passes the cursor over it and close when the cursor is off the menu item.
To get the dropdown to close automatically when opening another dropdown on a 'click' contact Flightdec Help to place extra code into the sites html.
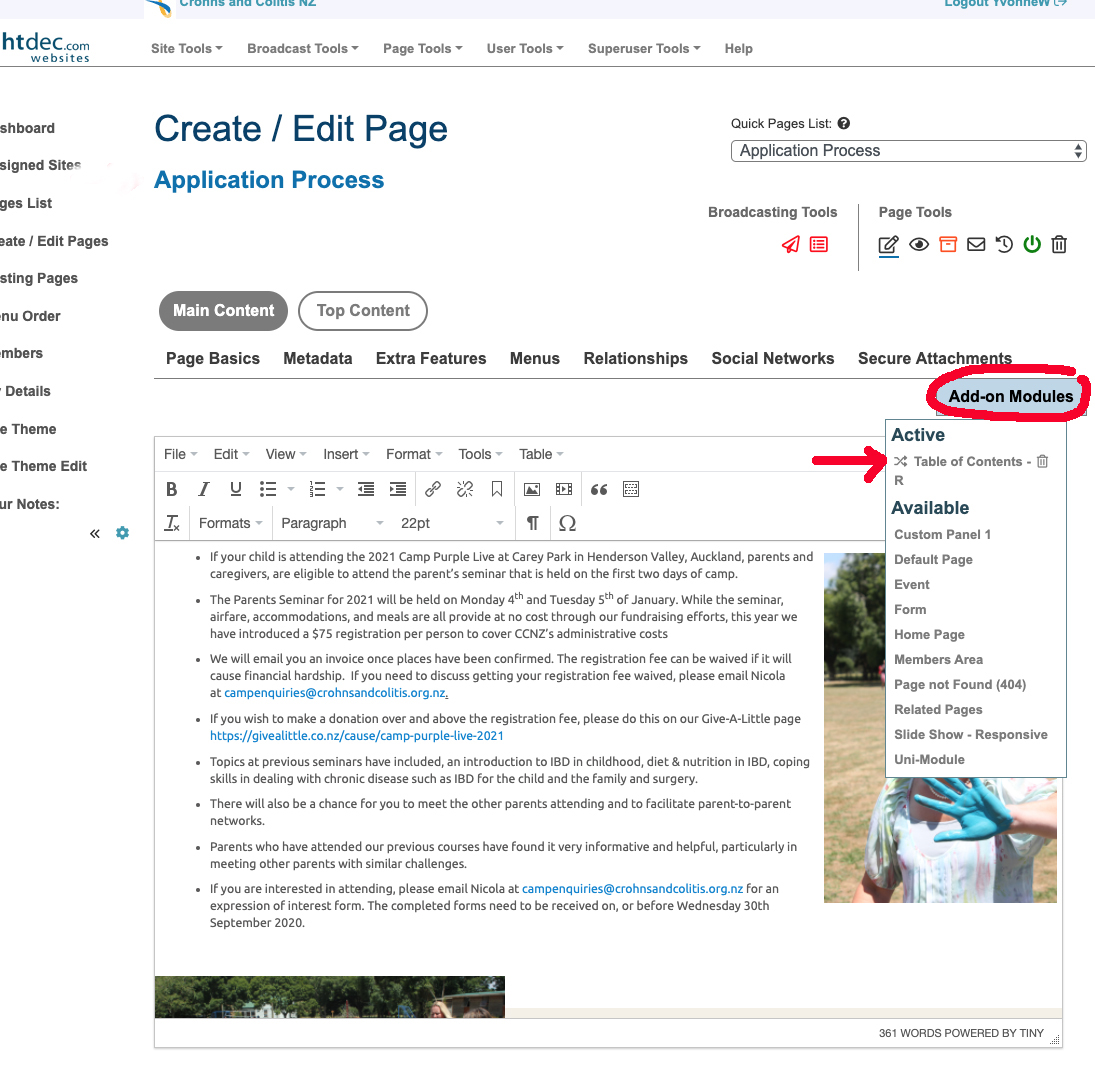
Go Page List: Find the page you want to add the TOC to: Edit
Under "Add-on-Modules" (blue button on the right)
select: Table of Contents
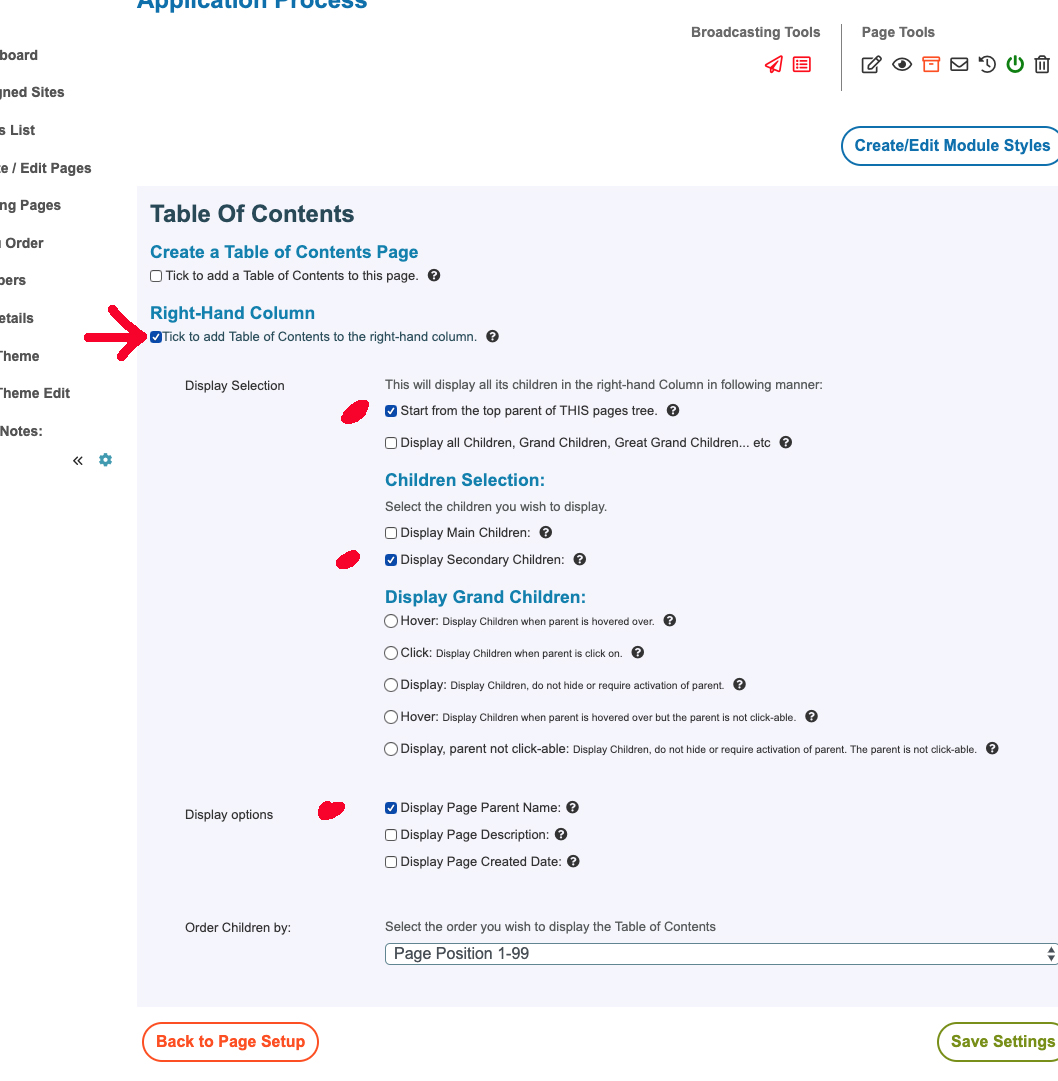
Select: Right-Hand Column
Tick to add Table of Contents to the right-hand column.
Read the options and fill or tick the appropriate:
eg: tick the following
Display Selection
Start from the top parent of THIS pages tree. Display Secondary Children:
Display options
Click: SAVE PAGE
To add a page name (child page) into an existing Table of Contents
Step 1 of 2
Go Page List: Find the page you want to add to the TOC: Edit
Under Relationships menu: Under Parent Page or Secondary Parent page, type in or select the parent page you want to assign this to.
Click: SAVE PAGE
Step 2 of 2
Under "Add-on-Modules" (blue button on the right)
Click: Table of Contents
Select: Right-Hand Column
Tick to add Table of Contents to the right-hand column.
Read the options and fill or tick the appropriate:
eg: tick the following
Display Selection
Start from the top parent of THIS pages tree. Display Secondary Children:
Display options
SAVE SETTINGS
To change the Parent Menu item to a Child menu item (submenu)
Go Page List: Find the page you want to change: Edit
Under Relationships menu: Type in or select the parent page you want to assign this to.
Under Menus menu: Page In Menu: Unclick tick and Page Position: assign page position 1, 2, 3... etc
You need to do this for all your children (sub-menu)that come under the “Parent Page” menu.
Note: All your pages that show in the Primary and Secondary Menus are “Parents” at this stage. Any “children” assigned to those parent pages will show in the TOC when we set it up.
Intro/page description on a TOC listings
This content is part of the module “table of contents” and it’s content has been taken from it’s ‘Page Description’. on it’s child page. Go to the child page you want to edit. Click on the Metadata menu button. Type in the ‘Page Description’. SAVE.
To make it show live. Go to Page List on the menu on the left hand side. Click the button on the top right that says Empty Cache. DELETE CACHE
Note: Relationship: This pages is a child to a parent page.