https://yourwebsiteaddress/admin Log in using your email address and password
NOTE that posting pages (blogs, articles, news, events, etc) can be done quickly and easily, without any management knowledge. Get the simple steps here.
If you want to add columns or a customise layout see Templates.
Flightdec page layout options.
The general default page setup is 4 areas of Content.
Main content: The large main area uses the wider area to the left of a right column - approx: 860px (max) wide
Right hand panel/Custom Panel 1: The area in the right of the page - approx: max 440px wide
Extra Content: Stretches across the entire width of the screen below the menu - approx: max 1400px wide Set images at approx: >1400x400px
Top Content: Stretches across the top of the main content and Right hand panel of the site - approx: max 1320px wide Set images at approx: >1200x400px
Bottom Content: Stretches across the bottom of the main content of the site or the bottom on the entire screen, depending on how it has been coded - approx: max 1320px or 1400px wide Set images at approx: >1320x400px or 1400x400px wide
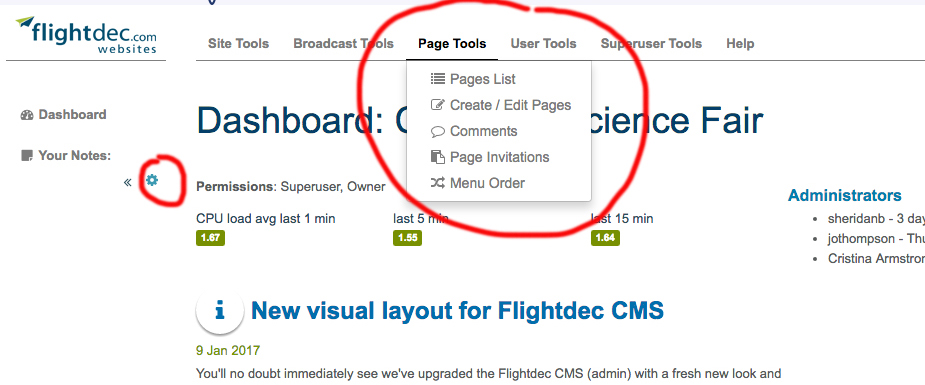
Under the top menu 'Page Tools'. Click on Page Tools to reveal a dropdown menu (Take a few moments to have a look at other items in the other menu dropdowns.) or;
On the left hand menu click on 'Page List', or;
On the left hand menu click on 'Dashboard'. See the last 5 pages created or edited or use the search box, or;
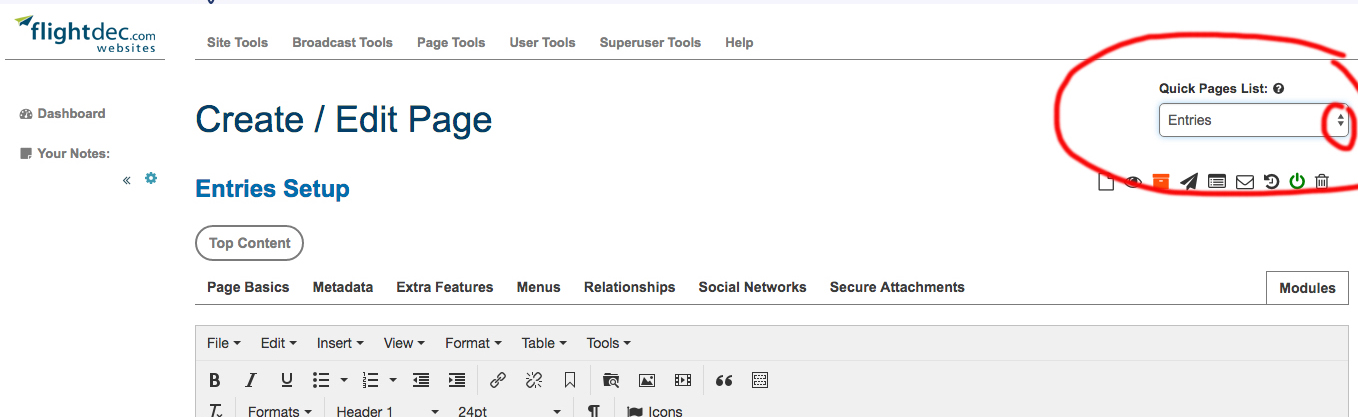
From within another page use the 'Quick Pages List'. Top right hand side.
1. On the left hand menu click on “Create / Edit Pages”
2. Under create a new page
Page Basics: Fill in the Details
Display Name: The name that will be displayed in the menu. Preferably keep it to one word.
Page URL: Make this a unique name in your website (no two the same). It becomes part of the page address (URL) which can be used to find the page and to create links to it.
If the name is changed anything linked to it will be broken and an error message will be displayed. By ticking 'Update pages" you will only update links within the site.
Do not make page headings using icons which may corrupt the page URL e.g. %#@
Read about odd symbols in your urls
The url is taken from the Page Name (not to be confused with the Display Name)
Macrons
https://ttoh.iwi.nz/kaum%C4%81tua the %C4%81 is code for the macron above the ā.
You can still refer clients to https://ttoh.iwi.nz/kaumātua and they will get to that page.
When linking to the page you can still use kaumātua
Solution: Do not use macrons or any other symbols other than 0-9 and a-z in Page Names
However it is ok to see them in Display names which show in the menu.
Spaces
https://ttoh.iwi.nz/Whanake%20Te%20Kurathe %20 is code for a space.
You can still refer clients to https://ttoh.iwi.nz/Whanake Te Kuraand they will get to that page.
Alternative solution:
Under Page Basics / Page Name:Tick to add hyphens (between words).
This will show in the url as https://ttoh.iwi.nz/Whanake-Te-Kura which is easier to see.
However you WONT be able to refer a client to https://ttoh.iwi.nz/Whanake Te Kura as it's now got hyphens instead of spaces.
Activate Page: Turn the page off or on.
3. Save Page
4. In the text editor, type in your content and insert images.
Display Name: The name that will be displayed in the menu. Preferably keep it to one word.
Page URL: Make this a unique name in your website (no two the same). It becomes part of the page address (URL) which can be used to find the page and to create links to it.
If the name is changed anything linked to it will be broken and an error message will be displayed. By ticking 'Update pages" you will only update links within the site.
Do not make page headings using icons which may corrupt the page URL e.g. %#@
Read about odd symbols in your urls
The url is taken from the Page Name (not to be confused with the Display Name)
Macrons
https://ttoh.iwi.nz/kaum%C4%81tua the %C4%81 is code for the macron above the ā.
You can still refer clients to https://ttoh.iwi.nz/kaumātua and they will get to that page.
When linking to the page you can still use kaumātua
Solution: Do not use macrons or any other symbols other than 0-9 and a-z in Page Names
However it is ok to see them in Display names which show in the menu.
Spaces
https://ttoh.iwi.nz/Whanake%20Te%20Kurathe %20 is code for a space.
You can still refer clients to https://ttoh.iwi.nz/Whanake Te Kuraand they will get to that page.
Alternative solution:
Under Page Basics / Page Name:Tick to add hyphens (between words).
This will show in the url as https://ttoh.iwi.nz/Whanake-Te-Kura which is easier to see.
However you WONT be able to refer a client to https://ttoh.iwi.nz/Whanake Te Kura as it's now got hyphens instead of spaces.
Go: to the menu directly above the text editor and click onto the tab called Paragraph or Header 1-6, Div Element or Blockquote.
Select the Heading Level you want. SAVE
Note: These are predesigned Heading Levels that will help make your site look professional as they will keep your site looking consistent. If you need size or colour change to these Headers please contact Flightdec Help. A change in these Headers will result in a change throughout the site.
To change the size of the headers and paragraph
Highlight the text you want to change.
Go: to the menu directly above the text editor, click the tab that has a px size on it
To make it smaller, select the 0.95em size and smaller, larger select 1.1em and above. SAVE
Note: These changes will not result in a change throughout the site, only to the highlighted text. These sizes don't change the line height so may not be good for large areas of text.
To change text align left, right, centered or justified
Highlight the text you want to change.
Go: to the 'menu item' to the right of the Tx icon.
Go: Alignment, select the attribute you want. SAVE
Note: Use Block/image when you want the text to wrap around an image.
To change text to have buttons, background colours, rules and no spacing above or below etc
Highlight the text you want to change.
Go: to the 'menu item' to the right of the Tx icon.
Go: Custom Styles, select the attribute you want. SAVE
Note: Contact Flightdec Help if you want a change or more attributes added.
Copying text from an external source
From other websites Preferably use Chrome as your browser.
On the website, with your cursor, highlight the text to be copied. Copy it: ctrl-c (PC), command-c (MAC).
Go back to your website admin and edit the page you want to paste the text on: ctrl-v (PC), command-v (MAC).
In your text editor, highlight the new text and strip the formatting by using the "Clear formatting icon" (Tx), then reformat it. SAVE
From Word documents Please don't copy and paste directly from msword. MSW thinks it knows HTML and adds a heap of junk code, which can make your content look inconsistent.
Solution
Do one of the following:
Paste your text into aplain text editorfirst (like TextEdit on Mac or Notepad on PC), then copy it into the site.
Use theClean Up Texttool in the site editor (it looks like a clipboard).
After pasting the text into the site page, highlight the text and use theClear Formattingicon (Tx), then reformat as needed. It doesn’t catch everything, so it’s worth checking thesource codeto be sure.
Linking images and text to other pages in your website.
Select the page to edit.
Highlight the image or text you want a link on.
Click on the ‘Insert/edit link icon’ (looks like a chain) add in page name you want to link to. eg: /home
Click OK SAVE PAGE
Linking images and text to other websites
Go to the website you want to link to.
Highlight the website url (address). Copy it. (pc: control c) (mac:command c)
Go to your website administration and find the page where the image or text is, you want linked.
Highlight the image or text you want a ‘link’ on.
Click on the ‘Insert/edit link icon’ (looks like a chain).
Paste (pc: control v)(mac:command v) the website url you want to link to in the box to the right of the word url.
Change ‘Open link in...’ from Current window to 'New window’ so that the website opens in a new window in the users browser and doesn’t close your website.
Note: The selection for 'New window’ will appear above the ‘Insert/Edit Link window
6. Click SAVESAVE PAGE
Use this website https://bitly.com/to convert your page URL/link to a shorter version if you need to put it on a printed document.
Linking emails address' and phone numbers
Highlight the email address or text you want to add the email or phone link to.
Click on the ‘Insert/edit link icon’ (looks like a chain).
Add in the url space: mailto:theemailaddress or tel:+phonenumbernospaces
Click SAVE
SAVE PAGE
On the font end of the site if the user clicks onto the link it should take them directly to their email programme with the email address.
Phone number links should dial directly on a mobile phone. On a computer it will prompt the user as to what method of contact they would like to use eg. Skype
Adding a downloadable pdf, ppt or Word doc
To add and link pdfs and other documents
In the text editor on the page you want your pdf on: highlight the text or image you want the pdf attached to. For example " Download and view the Report here"
Go to the Insert/edit link (chain icon) in your menu. Click onto the ‘up arrow icon’ to the right of the url field.
Find your pdf or other document.
If not there, create a New folder called "pdfs"
Upload and Add file(s) from your computer, or if already uploaded select your pdf by clicking on the file.
Changing the display name that is appearing on the page
The default 'display name' is taken from the url (pathway) to where the pdf is stored
Go to theInsert/edit link(chain icon) in your menu.
In the dialogue box under the wordsText to displaytype in your file name or any other text to be displayed eg. To see report, click here.
Save. Save Page
Pdf icon
A pdf icon may or may not appear. Let Flightdec admin know what your preference is.
To add and link a ppt
In the text editor on the page you want your ppt on: highlight the text you want the ppt attached to. For example " Download and view the Powerpoint Template here"
Go to the Insert/edit link (chain icon) in your menu. Click onto the ‘up arrow icon’ to the right of the url field.
Find your ppt. If not there, Create a folder called "ppt"
Upload and Add file(s) from your computer, or if already uploaded select your ppt by clicking on the file.
Changing the display name that is appearing on the page
The default 'display name' is taken from the url (pathway) to where the ppt is stored
Go to theInsert/edit link(chain icon) in your menu.
In the dialogue box under the wordsText to displaytype in your file name or any other text to be displayed eg. To see notes, click here.
Save. Save Page
ppt icon
A ppt icon may or may not appear. Let Flightdec admin know what your preference is.
To add and link a word document
In the text editor on the page you want your ppt on: highlight the text you want the ppt attached to. For example " Download and view the document here"
Go to the Insert/edit link (chain icon) in your menu. Click onto the ‘up arrow icon’ to the right of the url field.
Find your word document. If not there, Create a folder called "Documents"
Upload and Add file(s) from your computer, or if already uploaded select your word doc by clicking on the file.
Changing the display name that is appearing on the page
The default 'display name' is taken from the url (pathway) to where the word document is stored
Go to theInsert/edit link(chain icon) in your menu.
In the dialogue box under the wordsText to displaytype in your file name or any other text to be displayed eg. To see report, click here.
Save. Save Page
Word document icon
A pdf icon may or may not appear. Let Flightdec admin know what your preference is.
Link individual items (text or images) to other items on the same page or other pages within the website
Place your cursor at the beginning of the text or image you want the user to go to (the item that the link will find), select the Anchor (flag Icon)
Name that Anchor. SAVE
Highlight/select the text or image that you want the anchor to be linked to.
Click on the ‘Insert/edit link icon’ (chain icon)
Add in “#your anchor name” you want to link to.
Remember to puta # in front of the anchor name in this box.
NOTE: If you are linking to an Anchor tag on another page you will have to include that Page Name in your anchor tag eg. /page name#your anchor name
‘Target’ should be ‘blank’ so that it doesn’t open a new window on your browser.
Click SAVE SAVE PAGE
Hovers
A hover (change of state) on an image or text indicates that there is an active link on that item and the user can click onto it to get more information.
A gallery is one of the simplest ways of presenting a number of images on your website. When a user clicks on the thumbnail/preview image, that picture opens up in a larger format as the website fades in the background. The user can then scroll through the images in a slideshow format or go back to the preview screen. The Gallery module will automatically create the preview images.
2. If not working contact Flightdec and they will make sure the following css has been added to your site.
Or add it in yourself on your page: Extra Features > Style & Functionality > Page Styles: Enter the page unique CSS (This will only apply to the page you have added the code into not the entire site)